Initial Setup
This documentation provides a step-by-step guide to set up and integrate FirmwareCI with a git repository using the fwci CLI tool. You can add any number of git repositories to your FirmwareCI organization this way.
Attention: Synchronization is currently supported with GitHub and Gitlab repositories.
Prerequisites
- Ensure you have the
fwciCLI tool installed on your system. - A git repository where you want to set up the .firmwareci infrastructure.
Set Up .firmwareci Infrastructure
Navigate to Your Git Repository:
Open your terminal and navigate to the root directory of your git repository.
$ cd path/to/your/git/repositoryIntialization & review of .firmwareci structure:
Use the
fwciCLI tool to initialize the basic file structure for .firmwareci.$ fwci initThe resulting file structure should resemble the following:
$ fwci validate
.firmwareci/
├── duts
│   └── dut-fwci-crystal-core
│       ├── dut.yaml
│       ├── post.yaml
│       └── pre.yaml
├── README.md
├── storage
└── workflows
    └── fwci-crystal-core
        ├── tests
        │   └── test.yaml
        └── workflow.yaml
The
fwci-crystal-coredirectory encompasses all configurations related to a specific workflow, with its primary configuration located in theworkflow.yamlfile. An example test is provided within thetestssubdirectory.The
dutsdirectory contains configurations for DUTs. Each DUT directory includes its configuration file (dut.yaml), along with example pre-stage (pre.yaml) and post-stage (post.yaml) files.The
storagedirectory contains potential storage items used in tests.
A more detailed explanation of these files will be covered in subsequent guides and inside the references.
Synchronize Git Repository:
To complete the setup, you must integrate your git repository with the FirmwareCI server. This enables FirmwareCI to monitor and process all changes made to your repository.
Authenticate via CLI:
Log in using your FirmwareCI credentials:
fwci login <email> <password>Initiate Integration:
Execute the integration command to link your repository. You may be guided through additional installation steps depending on your chosen source. Refer to Integration Sources for further details.
Upon successful integration, you will receive a confirmation message and, for GitHub repositories, a link to finalize setup:
$ fwci integration
Successfully set up integration with github/<owner>/<repository>.
Please visit the following link to complete the integration setup: https://github.com/apps/blindspot-software-firmware-ci
By default, the integration targets the
originremote. To specify a different remote, use the-rflag:fwci integration -r upstreamYou may also directly specify an integration source:
fwci integration -o github:BlindSpotSoftware/corebootSource-Specific Integration:
GitLab:
Provide an access token using the--gitlab-authflag:fwci integration --gitlab-auth="ACCESS_TOKEN"Ensure the token has
api,read_repository, andwrite_repositorypermissions. For best practices, create a dedicated “FirmwareCI” user in your GitLab instance and generate the token from that account. Alternatively, a project access token may be used.Gerrit:
Supply the service user’s credentials using the--gerrit-authflag:fwci integration --gerrit-auth="USERNAME:PASSWORD"
Manage Integrations:
You can review and manage your integrations via the FirmwareCI dashboard or by running:
fwci integrationWhen executed within a git repository, this command will display all associated integrations. To update a project’s linked repository, rerun the integration command in the to be linked project directory and follow the prompts.
Integration Sources
GitHub
Visit the web-page of the Firmware CI App. Install and enable the app for any repository which should be integrated with FirmwareCI.
Gitlab
Create a Gitlab access token (select one method):
Option 1: User Access Token
- Navigate to your Gitlab account settings
- Select “Access Tokens” in the left navigation panel
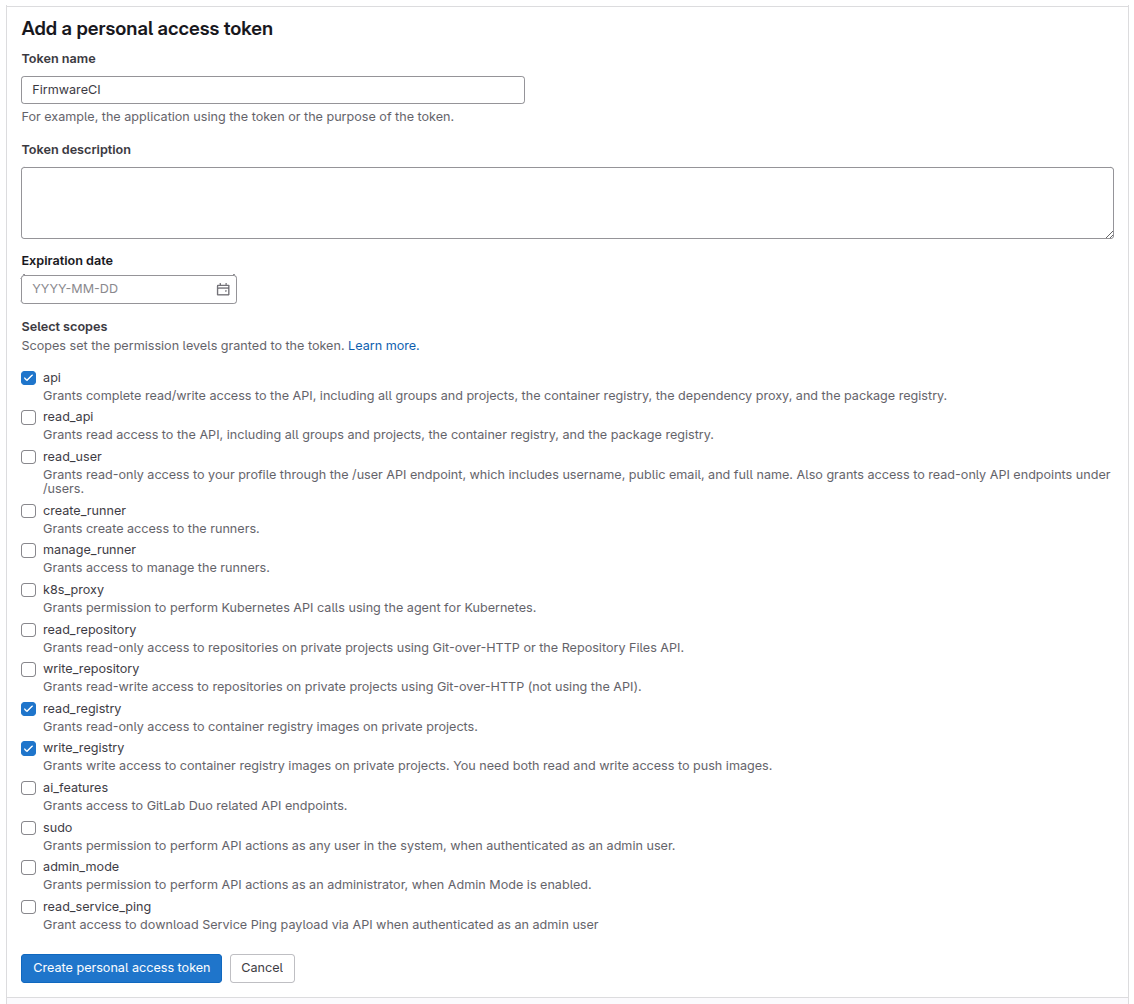
- Generate a new token with the required scopes:
api,read_repository
Option 2: Project Access Token
- Access your Gitlab project repository
- Navigate to Settings > Access Tokens
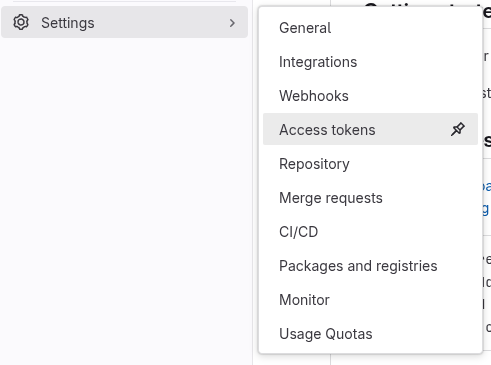
- Create a project access token with minimum
developerrole permissions and bothapiandread_repositoryscopes

- Integrate the repository using the following command:
fwci integration --gitlab-auth="YOUR_ACCESS_TOKEN"Visit the webpage of your project.
Scroll down to the Webhook Settings.
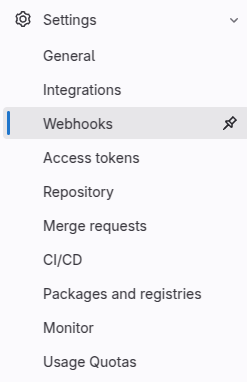
Add the webhook as shown and save.
Note: The secret token for the webhook will be provided upon request. Please contact the FirmwareCI team to obtain your specific webhook token.
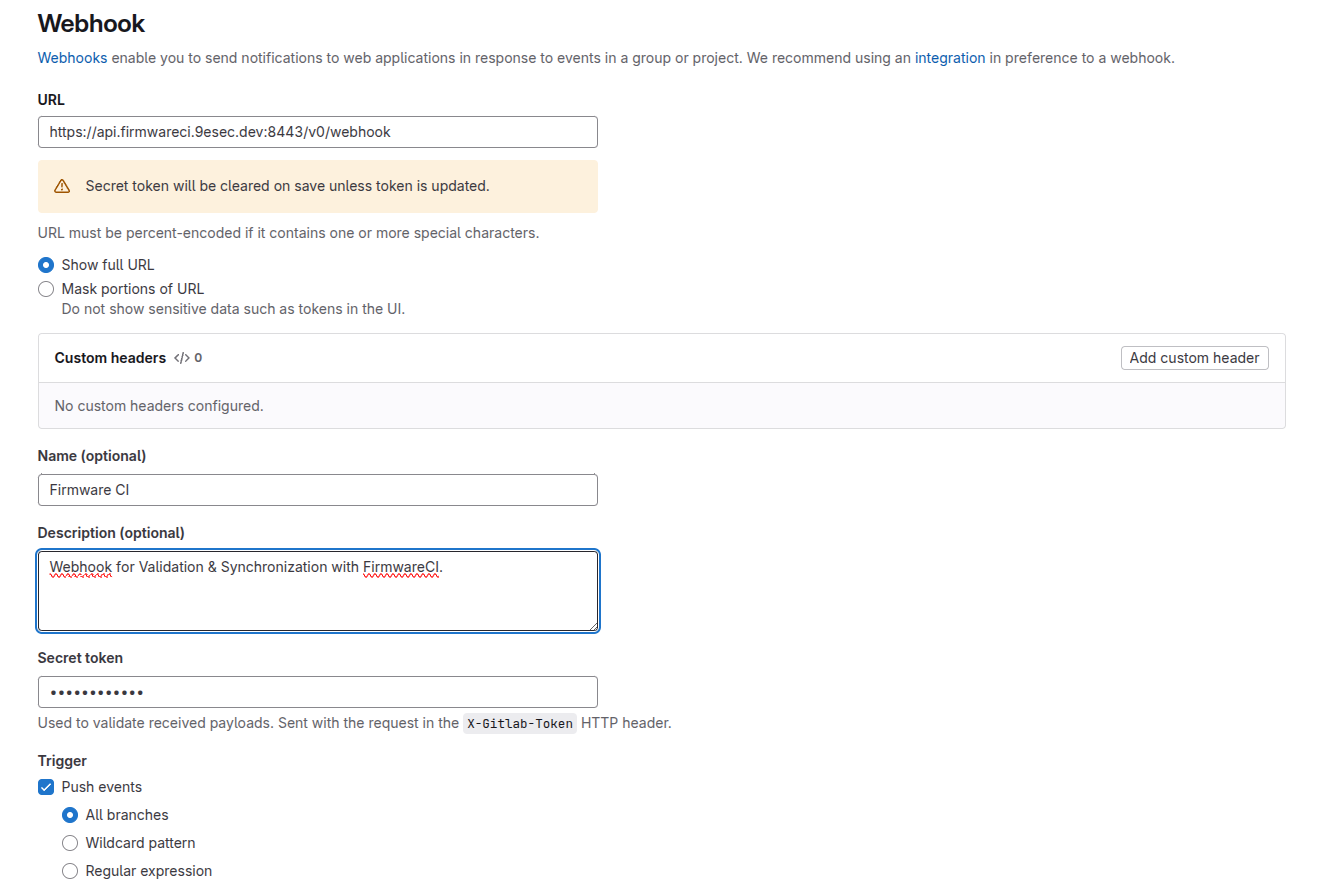
Default-Webhook-URL:
https://api.firmwareci.9esec.dev:8443- Gerrit
Synchronization for Gerrit repositories is currently supported exclusively through the FirmwareCI CLI. Webhook-based synchronization is not available at this time. To trigger FirmwareCI jobs for Gerrit, use the CLI commands outlined in the CLI Synchronization section below. You can still enable integration to allow FirmwareCI to send status updates and checks to your Gerrit instance for any jobs started on a patchset triggered by the Gerrit Job Trigger. For more information and setup instructions, see the Gerrit Integration documentation.
Caution: If you are using a self-hosted instance of FirmwareCI, ensure to update the URL to match your instance.
This will push the current commit to the FirmwareCI server for processing.
Commit the Changes:
Add the newly created .firmwareci files to your git repository and commit the changes.
$ git add .firmwareci
$ git commit -m "Initialize .firmwareci infrastructure"
$ git push
Note: For GitHub and Gitlab repositories, pushes to the default branch will trigger synchronizations on the FirmwareCI side. Pushes to any other branch will run a validation on all the files. This can be particularly useful for validating changes within a Pull Request before merging them into the default branch.
Check FirmwareCI Status
To check the status of your FirmwareCI setup and ensure everything is configured correctly, you can visit the FirmwareCI dashboard or check for a status report on the repository branch you just connected.
HTTPS Authentication for CLI Synchronization
When synchronizing with a remote repository over HTTPS, the CLI supports the following authentication flow:
Environment Variable (Recommended for Automation):
- Set the environment variable
GIT_TOKENto your personal access token (PAT) before running the CLI. - For GitLab, also set
GITLAB_USERNAMEto your GitLab username. - For Gerrit, set
GERRIT_USERNAMEto your Gerrit username. - For GitHub, the username is not required.
Example for GitHub:
export GIT_TOKEN=ghp_xxxExample for GitLab:
export GIT_TOKEN=glpat-xxx
export GITLAB_USERNAME=your_gitlab_username
Example for Gerrit:
export GIT_TOKEN=your_gerrit_http_password export GERRIT_USERNAME=your_gerrit_username- Set the environment variable
Interactive Prompt (Fallback):
- If no environment variable is set, the CLI will prompt you for credentials.
- For GitHub, you will be prompted for the token
- For GitLab and Gerrit, you will be prompted for both username and token/password.
Example prompt:
Enter username for https://gitlab.com/your/repo.git: your_gitlab_username
Enter token/password for https://gitlab.com/your/repo.git: <your PAT>
For GitHub:
Enter token/password for https://github.com/your/repo.git: <your PAT>
Note:
- For GitHub, generate a Personal Access Token (PAT) with
reposcope. - For GitLab, generate a Personal Access Token with
apiandread_repositoryscopes. - For Gerrit, use your HTTP password (not your site login password), which can be generated in your Gerrit settings.
CLI Synchronization
You can also synchronize your codebase with FirmwareCI directly through the CLI without webhook integration, subject to the following requirements:
- The specific commit you intend to synchronize must be checked out locally
- Your working directory must contain no uncommitted changes
- The commit must be pushed to the remote repository (this is required as FirmwareCI generates web links to commit changes in the UI)
Important Note: CLI synchronization should be reserved for specific scenarios, such as:
- When synchronizing commits outside the default branch
- When network restrictions prevent your version control system from communicating with the FirmwareCI instance
- For troubleshooting integration issues
HTTPS Authentication for CLI Synchronization
When synchronizing with a remote repository over HTTPS, the CLI supports the following authentication flow:
Environment Variable (Recommended for Automation):
- Set the environment variable
GIT_TOKENto your personal access token (PAT) before running the CLI. - For GitLab, also set
GITLAB_USERNAMEto your GitLab username. - For Gerrit, set
GERRIT_USERNAMEto your Gerrit username. - For GitHub, the username is not required.
Example for GitHub:
export GIT_TOKEN=ghp_xxxExample for GitLab:
export GIT_TOKEN=glpat-xxx
export GITLAB_USERNAME=your_gitlab_username
Example for Gerrit:
export GIT_TOKEN=your_gerrit_http_password export GERRIT_USERNAME=your_gerrit_username- Set the environment variable
Interactive Prompt (Fallback):
- If no environment variable is set, the CLI will prompt you for credentials.
- For GitHub, you will be prompted for the token
- For GitLab and Gerrit, you will be prompted for both username and token/password.
Example prompt:
Enter username for https://gitlab.com/your/repo.git: your_gitlab_username
Enter token/password for https://gitlab.com/your/repo.git: <your PAT>
For GitHub:
Enter token/password for https://github.com/your/repo.git: <your PAT>
Note:
- For GitHub, generate a Personal Access Token (PAT) with
reposcope. - For GitLab, generate a Personal Access Token with
apiandread_repositoryscopes. - For Gerrit, use your HTTP password (not your site login password), which can be generated in your Gerrit settings.
To synchronize using the CLI method:
$ fwci synchronization
Logged in as fabian.wienand@blindspot.software in https://gitlab.com/firmware-ci/development.git@29e5e3d

commit 29e5e3d08661fe31053ce0fe5d07fad7b26274a6
Author: Fabian Wienand <fabian.wienand@blindspot.software>
Date:   Tue Apr 01 08:56:21 2025 +0000

    Merge branch 'fwci-iac' into 'main'

    feat: add fwci IaC

    These are a bunch of changes

    Signed-off-by: Fabian Wienand <fabian.wienand@blindspot.software>